Styling the action bar of the map_view Flutter package
Tom Oehlrich
As of now, December 2018, Flutter's own Google Maps solution is still not availabe as a stable version.
If you want to follow the progress of the Google Maps package the Flutter team is currently working on have a look here: https://pub.dartlang.org/packages/google_maps_flutter
While you can already use this developers preview one alternative for now is the map_view package developed by AppTree Software. This package supports markers, polylines, polygons among others and from my experience runs very stable.
Update February 2019: This plugin is no longer under development. There are a couple of forks though. The one I am using is https://github.com/Eimji/flutter_google_map_view.
It comes with a caveat though. The map opens as a full screen plugin and is not embedded in the Flutter widget hierarchy. You won't be able to show a smaller version of the map or overlay it with some custom buttons. You can opt to not show the appbar or if you do your customization options are limited.
Therefore the objective is to adapt the map's appbar as much as possible to the appbar styling you are using throughout your app.
To achieve that in Android we have to modify the AndroidManifest.xml and add some drawables.
After you have followed the package's installation steps open the android/app/src/main/AndroidManifest.xml and change
<activity
    android:name="com.apptreesoftware.mapview.MapActivity"
    android:theme="@style/Theme.AppCompat.Light.DarkActionBar"
/>
to
<activity
    android:name="com.apptreesoftware.mapview.MapActivity"
    android:theme="@style/CustomActionBarTheme"
/>
Next let's define two colors, a background color and a text color, in a new file colors.xml in android/app/src/main/res/values. Modify the color values to match your app theme.
<?xml version="1.0" encoding="utf-8"?>
<resources>
    <color name="custom_action_bar_background_color">#1565c0</color>
    <color name="custom_action_bar_text_color">#FFFFFF</color>
</resources>
We'll also need a new drawable actionbar_background.xml in android/app/src/main/res/drawable:
<?xml version="1.0" encoding="utf-8"?>
<layer-list xmlns:android="http://schemas.android.com/apk/res/android">
    <item android:drawable="@color/custom_action_bar_background_color" />
</layer-list>
Lastly to put everything together we create a themes.xml in android/app/src/main/res/values. This snippet is taken directly from the Android documentation with some adaptations for our use case.
<?xml version="1.0" encoding="utf-8"?>
<resources>
<!– the theme applied to the application or activity –>
<style name="CustomActionBarTheme"
parent="@style/Theme.AppCompat.Light">
<item name="android:actionBarStyle">@style/MyActionBar</item>
<item name="android:actionMenuTextColor">@color/custom_action_bar_text_color</item>
<!– Support library compatibility –>
<item name="actionBarStyle">@style/MyActionBar</item>
<item name="actionMenuTextColor">@color/custom_action_bar_text_color</item>
</style>
<!– ActionBar styles –>
<style name="MyActionBar"
parent="@style/Widget.AppCompat.Light.ActionBar.Solid.Inverse">
<item name="android:background">@drawable/actionbar_background</item>
<item name="android:titleTextStyle">@style/MyActionBarTitleText</item>
<!– Support library compatibility –>
<item name="background">@drawable/actionbar_background</item>
<item name="titleTextStyle">@style/MyActionBarTitleText</item>
</style>
<!– ActionBar title text –>
<style name="MyActionBarTitleText"
parent="@style/TextAppearance.AppCompat.Widget.ActionBar.Title">
<item name="android:textColor">@color/custom_action_bar_text_color</item>
<!– The textColor property is backward compatible with the Support Library –>
</style>
</resources>
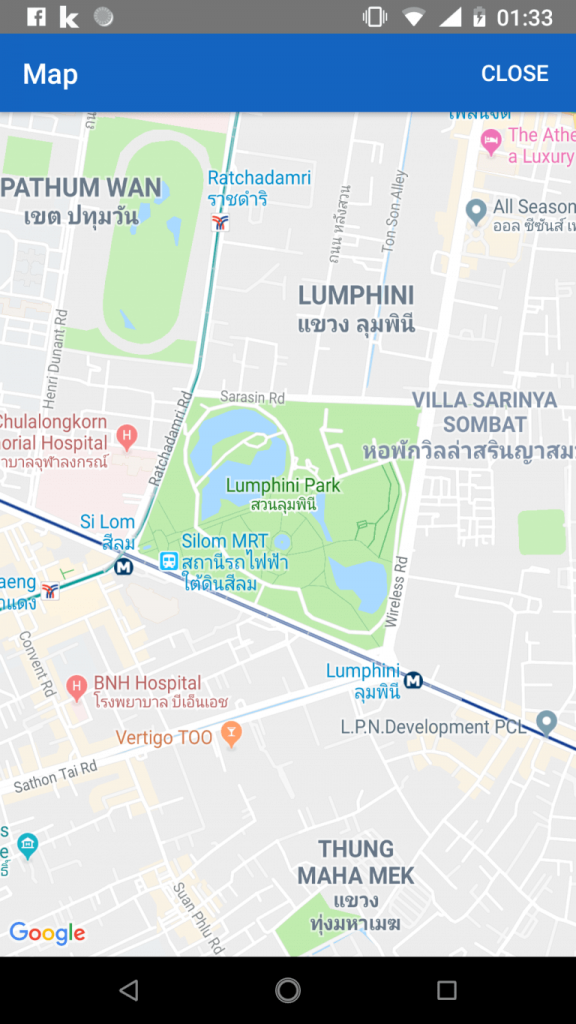
As a result you should have something like this:

While this is by far not the perfect way to handle our customization needs it serves well as a temporary workaround until the Flutter team publishes its first stable version of a Flutter Google Maps package.
You can find the full source code in this GitHub repo.
Note: I haven't tested this demo on an iOS device or simulator. But it should work fine if you follow the installation steps.
